
How to install Windows 11 on a PC that doesn’t support TPM 2.0?
Windows 11 released with a lot of speculations and expectations last year. Windows users were excited to install Microsoft’s new operating system. But, Windows 11 required some special hardware features to get installed on a PC. Such as Trusted Platform Module 2.0 (TPM 2.0) and Secure Boot. These features are available in latest computers, but some old PCs didn’t come with them, despite having great processor and RAM.

Today I will show you how to install Windows 11 successfully on a PC that does not support features like TPM 2.0 or secure boot.
Note: Windows 11 is not officially supported on a device without TPM 2.0. Install at your own risk.
To install Windows 11 on an unsupported device all you need to do is make some changes in the Registry. If you are not comfortable with it, this is the right time to decide whether you want to proceed or buy a new computer.
Assuming you have decided to proceed, let me tell you that Microsoft announced they will allow Original Equipment Manufacturers to disable TPM requirement for their modified version of Windows 11. We are going to do exactly the same.
Also Read: How to install any APK android apps on Windows 11 in Unsupported Countries
Perform the following instructions to Install Windows 11 on a PC that doesn’t support TPM 2.0
1. Go to Microsoft’s Windows 11 Download Page and download the OS. You will see three options to download, choose one.
2. Perform the on-screen instructions and continue.
3. If your PC does not support Windows 11’s hardware requirements, the installation wizard will show you this message: ‘This PC can’t run Windows 11’.
4. Now, open Command Prompt as Administrator.
5. Type ‘regedit’ and press Enter.
6. Windows Registry Editor window will open. Click on the address bar, type ‘HKEY_LOCAL_MACHINE\SYSTEM\Setup’ and press Enter. (Copy the address to avoid typo)
7. You will see the ‘Setup’ key. Right-click it and choose New > Key
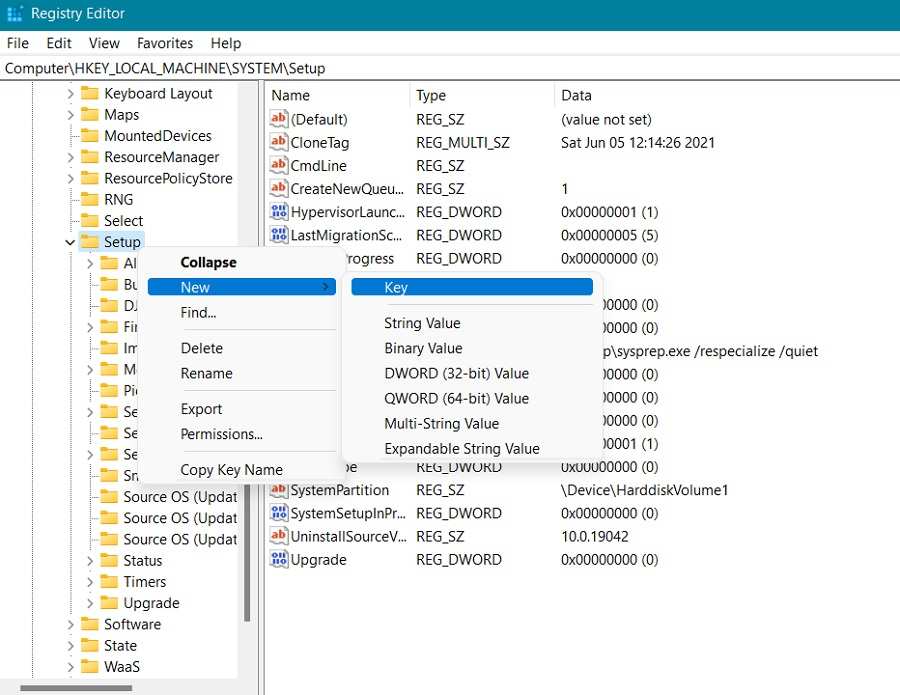
8. You will be asked to give a name for the new key. Choose ‘LabConfig’ and press enter
9. Right-click on the new key you have just created and choose New > DWORD (32-bit) value
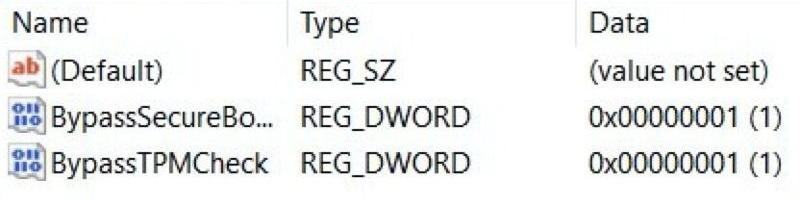
10. Give it the name ‘BypassTPMCheck’ and set its data to 1
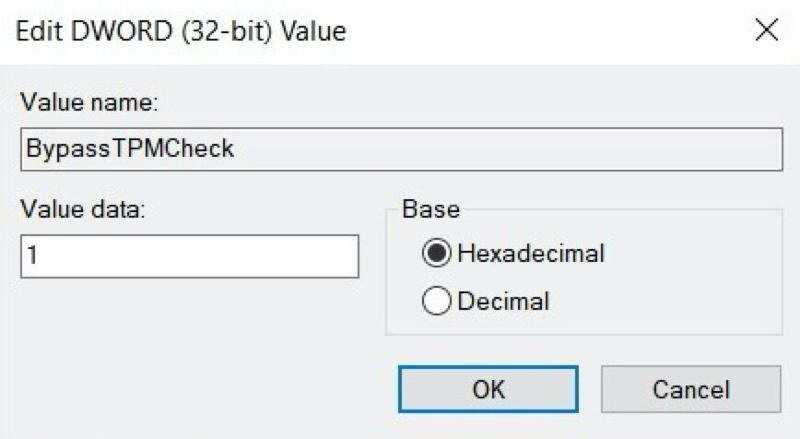
Follow the same process for ‘BypassSecureBootCheck’, with the same value of 1 (If your PC does not support Secure Boot).
11. Now close Registry Editor and Command Prompt window.
12. Okay, now you are back to the “This PC can’t run Windows 11” message. Click on the Back button and proceed. The setup should not prompt you with same message now.
You can successfully install Windows 11 now.
Also Read: HOW TO INSTALL WORDPRESS ON WINDOWS 11 FOR OFFLINE WEBHOSTING?
Please note: Windows 11 on unsupported device may cause performance issues and stability. You should proceed with caution.
The hardware requirements in Windows 11 are primarily for security, even if many people feel they are overly severe. Using an operating system that isn’t meant to function without a TPM chip or Secure Boot is risky, but if your device fits the majority of the requirements, you’ll probably get away with it.
The older the gear, the more dangerous it is. In any case, we recommend installing it on a laptop or PC that isn’t your primary computer. If you can’t prevent it, make a full backup of your device first to guarantee you don’t lose anything important.
Thank you for reading. If you think this post helped you, please leave a comment and suggest new topics you want to discuss.